Friday 6 November 2015

Chapter 6: Computer Animation Types and Techniques

Multimedia Technology

Chapter 6: Computer Animation Types and Techniques

By: Dr. Zeeshan Bhatti


Animation is about bringing things to life. Moving something which can't move itself a sequence of images that, when played one after the other, make things move.

What is computer animation?
• Creating moving images via the use of computers
• Subfield of computer graphics
• Applications :
   – Films
   – TV programs
   – Computer games
   – Web contents
Topics of computer animation
• Character animation (3D animation)
    – Keyframe animation, motion capture
    – Rigging, facial animation
    – Motion planning, motion editing
    – Crowd simulation
• Physically-based animation
    – Rigid objects
    – Cloth, strands, deformable objects
    – Fluids (fire, water, smoke)
• Geometric modelling and editing
• 2D Cell Animation

  • Animation History
  • Animation Types
  • Animation Techniques
  • Cell Animation 
  • Keyframe Animation
  • Motion Capture
  • Procedural Animation

Sunday 25 October 2015

Module 3 Lecture 5: Installing Active Director on Windows Server 2008

Module 3 Lecture 5: Installing Active Director on Windows Server 2008
In this lesson we would learn about Active Director and How to install Active director setup in windows Server 2008.

 What is Active Directory?
­ 
- Lightweight Directory Access Protocol (LDAP) Directory Service
­- Works with and requires DNS
­- Incorporated into Windows 2000 and XP
­- Centrally Managed
­- Extensible
­- Interoperable

Module 3_Lecture 3 - Installing Domain Controllers

Module 3_Lecture 3 - Installing Domain Controllers
Installing Domain Controllers setup in Windows server 2008.
 - One of the greatest features of Windows Server 2003 is its ability to be a Domain Controller (DC). 
   - The full features of a domain are beyond the scope of this workshop, but some of its most well known features are its ability to store user names and passwords on a central computer (the Domain Controller) or computers (several Domain Controllers). 
  -  In this tutorial we will cover the "promoting" (or creating) of the first DC in a domain.  This will include DNS installation, because without DNS the client computers wouldn't know who the DC is. 
  - You can host DNS on a different server, but we'll only deal with the basics.

Step by Step Guide to install DHCP role and configure

This is another simple tutorial that would help students understand and install DHCP easily. I noted several students were still having problems and getting errors while installing DHCP in windows server 2008. Let’s see how we can configure DHCP server in a Windows Server Environment. For the demo I will be using Windows 2008 R2 Server.

To start first need to log in to the server with administrator privileges. Then start the “server Manager” by clicking on “Server Manager” icon on task bar. Then go to “Roles”


dhcp1

Then click on “Add Roles” option to open Add roles Wizard.
dhcp2 


Then it will load the Roles Wizard and select the “DHCP Server” From the list and click next to continue.

dhcp3

Then it will give description about the role. Click next to continue.

dhcp4

Next window is asking to use which interface to serve DHCP clients. If server has multiple NIC with multiple IP you can add them also to serve DHCP clients.

dhcp5

In next window it will give opportunity to add DNS settings that should apply for DHCP clients.


dhcp6

Next window is to define the WINS server details.

dhcp7

In next window we can add the scope, the Starting IP, End IP of the DHCP range, subnet mask, default gateway, leased time etc.

dhcp8

In next Window it can configure to support IPv6 as well.

dhcp9

Then it will give the confirmation window before begin the install. Click on “Install”

dhcp10

Once installation finishes DHCP server interface can open from Start > Administrative Tools > DHCP

dhcp11

Using the DHCP it is possible to even configure multiple Scopes configurations to the network. In a network there can be different network segments. It is waste to setup different DHCP servers for each segment. Instead of that it is possible to create different Scopes to issue DHCP for them.

Monday 14 September 2015

Color Subsampling, or What is 4:4:4 or 4:2:2??

Color Subsampling, or What is 4:4:4 or 4:2:2??

By: Karl Soule 

Source (http://blogs.adobe.com/VideoRoad/2010/06/color_subsampling_or_what_is_4.html)

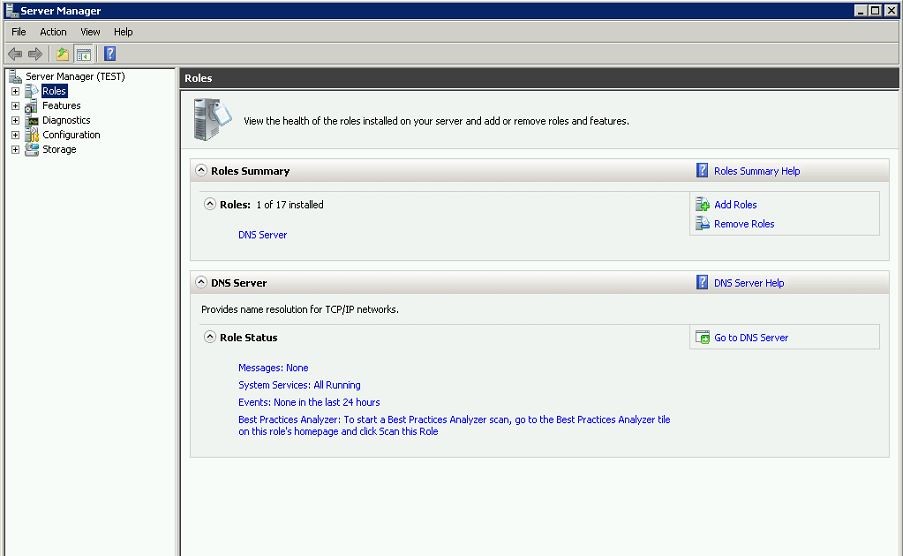
In the video space, there’s always a lot of talk about these number ratios – 4:4:4, or 4:2:2, or 4:1:1, but what exactly do they mean? Recently, someone argued with me that it was better to convert every video clip from my Canon Rebel T2i DSLR camera into a 4:4:4 intermediate codec before editing; that this would make the color magically “better” and that editing natively was somehow bad. They were wrong, and I’m going to explain why.

One trick that video engineers have used for years is to toss away a lot of the color information. Basically, they can toss away the color values on every other pixel, and it’s not very noticeable. In some cases, they throw away even more color information. This is called Color Subsampling, and it’s a big part of a lot of modern HD formats for video.
When looking at color subsampling, you use a ratio to express what the color subsampling is. Most of us are familiar with these numbers: 4:4:4, or 4:2:2, or 4:1:1, and most of us are aware that bigger numbers are better. Fewer people understand what the numbers actually mean. It’s actually pretty easy.
Let’s pretend that we are looking at a small part of a frame – just a 4×4 matrix of pixels in an image:
Pixel Grid 444.jpg
In this example, every pixel has a Y value, a Cb value, and a Cr value. If you look at a line of pixels, and count how many Y, U, and V values, you’d say that there are 4 values of Y, 4 values for U, and 4 values of V. In color shorthand, we’d say that this is a 4:4:4 image.
4:4:4 color is a platinum standard for color, and it’s extremely rare to see a recording device or camera that outputs 4:4:4 color. Since the human eye doesn’t really notice when color is removed, most of the higher-end devices output something called 4:2:2. Here’s what that 4×4 matrix would look like for 4:2:2:
Pixel Grid 422.jpg
As you can see, half of the pixels are missing the color data. Looking at that 4×4 grid, 4:2:2 color may not look that good, but 4:2:2 color is actually considered a very good color standard. Most computer software can use the neighboring color values and average in the values of the missing color values.
Let’s look at 4:1:1 color, which is used for NTSC DV video:
Pixel Grid 411.jpg
Bleaccch. 75% of the color for each pixel is tossed away! With bigger “gaps” between color information, it’s even harder for software to “rebuild” the missing values, but it happens. This is one of the reasons that re-compressing DV can cause color smearing from generation to generation.
Let’s look at one other color subsampling, which is called 4:2:0, and is used very frequently in MPEG encoding schemes:
Pixel Grid 420.jpg
This diagram shows one of many ways that 4:2:0 color subsampling can be accomplished, but the general idea is the same – Luma samples for each pixel, one line has Cb samples for every other pixel, and the next line has Cr samples for every other pixel.
With a color subsampled image, it’s up to the program decoding the picture to estimate the missing pixel values, using the surrounding intact color values, and providing smoothing between the averaged values.

Okay – we’ve defined what color subsampling is. Now, how does that relate to my friend’s earlier argument?
Well, in my DSLR camera, the color information is subsampled to 4:2:0 color space in the camera. In other words, the camera is throwing away the color information. It’s the weakest link in the chain! Converting from 4:2:0 to 4:4:4 at this stage doesn’t “magically” bring back the thrown-away data – the data was lost prior to hitting the memory card. It’s just taking the data that’s already there, and “upsampling” the missing color values by averaging between the adjoining values.
Inside Premiere Pro, the images will stay exactly as they were recorded in-camera for cuts-only edits. If there’s no color work going on, the 4:2:0 values remain untouched. If I need to do some color grading, Premiere Pro will, on-the-fly, upsample the footage to 4:4:4, and it does this very well, and in a lot of cases, in real-time.

Going to a 4:4:4 intermediate codec does have some benefits – in the transcode process, upsampling every frame to 4:4:4 means that your CPU doesn’t have as much work to do, and may give you better performance on older systems, but there’s a huge time penalty in transcoding. And, it doesn’t get you any “better color” than going native. Whether you upsample prior to editing or do it on-the-fly in Premiere Pro, the color info was already lost in the camera.

In fact, I could argue that Premiere Pro is the better solution for certain types of editing because we leave the color samples alone when possible. If the edit is re-encoded to a 4:2:0 format, Premiere Pro can use the original color samples and pass those along to the encoder in certain circumstances. Upsampling and downsampling can cause errors, since the encoder can’t tell the difference between the original color samples and the rebuilt, averaged ones.

I’m not trying to knock intermediate codecs – there are some very valid reasons why certain people need them in their pipeline. But, for people just editing in the Adobe Production Premium suite, they won’t magically add more color data, and may waste you a lot of time. Take advantage of the native editing in Premiere Pro CS5, and you’ll like what you see. :-)

Article Source (http://blogs.adobe.com/VideoRoad/2010/06/color_subsampling_or_what_is_4.html)

Monday 7 September 2015

Photoshop Lab Task 8 Super Cool Frilly Text,

Photoshop Lab Task 8


This tutorial creates a Super Cool Frilly Text banner.  The first thing to do is to find the elements we will use. There are lots of websites where you can find nice vectors, and there's a post from Cameron Moll with a huge list of these sites. So that's a nice place to start.
 
Step 2
Open Photoshop and create a new document. I used 1680x1050 pixels. After that, type  abduzeedo and go to Layer>Layer Style>Gradient Overlay. Use Red, Yellow, Green, and Light Blue for the colors. I used Futura for the typeface


Step 3
Let's start mixing the vectors with the type. First you will have to find the right "ornament"
for the letter you want. Then you will have to place it in a way that it follows the shape of
that letter. In the image below you can see that the "ornament" seems to be coming from
the "a".
After you align the ornament with the letter, it's time to add some depth. To do that let's
use the Layer Styles. Go to Layer>Layer Styles>Drop Shadow. Use Multiply for the
Blend Mode, Black for the color, 100% Opacity, -60% Angle, Distance of 5 pixels
and Size of 5 pixels as well.


http://cameronmoll.com/archives/2008/05/25_resources_ornaments_fleurons/
 
After checking all the sites out, I bought the vectors from


http://www.istockphoto.com/file_closeup/object/5836792_floral_design_elements.php? id=583679


Now follow the step by step instruction provided in the handout below.

Photoshop Task 4, Creating a Wooden Frame & Mising Pictures

Photoshop Task 4

 Introduction:
Adobe Photoshop is an Image Processing software package that enables you to create & edit images on IBM personal Computers. Adobe Photoshop is acknowledged in professional fields as the cutting-edge Program, the final word in Textile Designing. Adobe Photoshop is world leading image manipulating program for graphics art and is used extensively in printing, publishing, www, photographic and graphic design industries.

Task _1: Creating a Wooden Frame

Task_2: Mixing two pictures with layer effects to create a wallpaper.


Object: To learn about Photoshop work area.
  1. To make wood effect on text.
  2. Take an image and make advance wooden frame around it.
  3. Combine two pictures using Feather option
Tool: Adobe Photoshop

Introduction:Adobe Photoshop is an Image Processing software package that enables you to create & edit images on IBM personal Computers. Adobe Photoshop is acknowledged in professional fields as the cutting-edge Program, the final word in Textile Designing.
Adobe Photoshop is world leading image manipulating program for graphics art and is used extensively in printing, publishing, www, photographic and graphic design industries.

About the work area

The work area consists of the following components:
Menu bar
The menu bar contains menus for performing tasks. The menus are organized by topic. For example, the Layers menu contains commands for working with layers.
Options bar
The options bar provides options for using a tool.
To display the tool options bar: Do one of the following:
    • Choose Window > Options.
    • Click a tool in the toolbox.
Lasso options bar
Toolbox
The toolbox holds tools for creating and editing images. To show or hide the toolbox:
Choose Window > Tools. A check mark indicates the item is showing.
Palette well (Photoshop)
The palette well helps you organize the palettes in your work area.
Palettes
Palettes help you monitor and modify images
To display one palette:
Choose the palette name in the Window menu.
To show or hide multiple palettes:
Do one of the following:
    • To show or hide all open palettes, the options bar, and the toolbox, press Tab.
    • To show or hide all palettes, press Shift+Tab.


Theory:
Layers allow you to work on one element of an image without disturbing the others. Where there is no image on a layer, you can see through to the layers below. You can change the composition of an image by changing the order and attributes of layers. In addition, special features such as adjustment layers, fill layers, and layer styles let you create sophisticated effects.
Layer styles let you quickly apply effects to a layer's content. The effects that you apply to a layer become part of the layer's custom style. When a layer has a style, an "f" icon appears to the right of the layer's name in the Layers palette.
The lasso and polygonal lasso tools let you draw both straight-edged and freehand segments of a selection border.
Feathering Blurs edges by building a transition boundary between the selection and its surrounding pixels. This blurring can cause some loss of detail at the edge of the selection.
Procedure:
  1. Wood Text
1. Open Photoshop 7.0. Type the text using type tool.


2.
Layer > Layer Style > Bevel and Emboss
3. Select inner bevel Depth 400
4. Select Drop Shadow
5. Select Pattern Overlay. From the pattern, select Wood Texture
( forth in the first row )
6. Add background color using paint bucket tool to decorate the text.
b) Advance Wooden Frame

1. Try to complete Wood text exercise before starting this exercise.
2. Using Polygon Lasso Tool, make left side of the frame.
3. Make a new layer and fill the selection with pattern of Wood using paint bucket tool.
4. Make a copy of layer.
5. Flip the copy using.
Edit > Transform > Flip Horizontal
Edit > Transform > Flip Vertical
6. Adjust all the parts properly to create the frame structure.
7. Off the visibility icon i.e. EYE of the background layer select any of the frame layer and click 'Merge Visible' from layers menu to get frame with single layer.
8. To make the frame more realistic use bevel effect on the frame.
Layer > Layer Style > Bevel & Emboss > Inner Bevel
9. Apply inner shadow with default values.
Layer > Layer Style > Bevel & Emboss > Inner Shadow
10. Drag the image on the frame. Drag the image layer below the frame layer.
c) Combine two pictures using Feather option
1. Select a picture that smoothly fades into the background.
2. Open Photoshop. Open main image which will be used as a base.
3. Open another image to apply simple fading effect.
4. Drag this image on the main image using Move Tool. Keep this Layer selected.
5. Select Lasso Tool. Make an irregular selection.
6. Select > Feather (9)
7. Select > Inverse
8. Press Delete and you get a Vignette. Press Ctrl + D to deselect.
9. Change the Layer mode to Overlay to mix it with background.
Result:
We have become familiar how To make wood effect on text, how to make wooden frame around an image and how to combine two pictures using Feather option.

Featured post

Addmision are open

  Offering Professional Courses in the field of  Multimedia, Animation and Graphics